Taming the Garmin Etrex 20/30:

Basic Setup (part 1)
Basic Setup (part 1) - System, Tones, Display and Tracks.Basic Setup (part 2) - Position Format, Heading, Altimeter, Fitness, Routing and Profiles.
Map Setup (part 3) - and some other Page Setups.
These notes and screenshots show a basic cyclists' setup for an Etrex 30 (and 20).
NB to follow a similar procedure with the Etrex C models (such as Legend and Vista) see this page - Basic Etrex C Setup
The idea with most of this stuff is to SET IT, then FORGET IT.
The main keys in use for all this are:
Menu (bottom l-h key)
Enter (front click stick and scroller)
Back (top r-h key)
A key sequence might be written like this:
Menu->Menu->Setup->Map->Orientation
(from any page, this will show the option to switch Track Up / North Up)
|
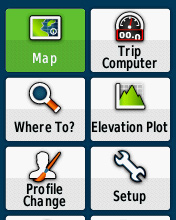
Start up your new Etrex, and out of the box it goes to the Main Menu page which looks like this. This shows just 6 out of 27 options, you have to scroll down to see the rest - later we'll re-arrange these 'tiles' to get our favourites at or near the top of the list. (Or if you want to start on that straight away, see here.)
Ideally, at this point it's a good idea to take two simple 'backup' precautions. One is to connect the GPS to your PC (in 'Mass Storage' mode if you see a prompt) and use your File manager to copy everything you find onto HD as a backup of the GPS setup as new.
All screenshots are Etrex 30
| |
|
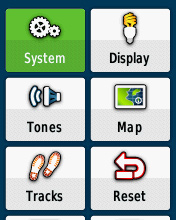
Now let's go straight into the Setup menu to deal with a few basics, which as it happens are all grouped on the first page of the setup menu. Use the Enter key to nudge down to Setup and click. This (see left) is the first 6 of 18 setup options by the way, you have to scroll down to see the other 12 items in this menu. (NB in theory, you can re-order these 18 setup choices to get your own six favourites on Setup Page 1 - on my early production E30, out of the box with no firmware updates, this doesn't work. The default arrangement is quite good anyway - I would only swap the 'Reset' button for the 'Routing' one which is currently on page 3.)
| |
|
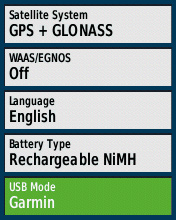
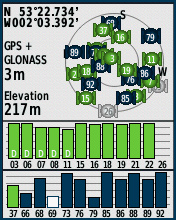
Go straight into the first option, System, and my choices are like this (see left). For best battery performance, you would turn the GLONASS satellite reception and the WAAS/EGNOS off. But I have to say it's a bit of a buzz to see so many satellites being picked up (right), so I have GLONASS on. I don't think it contributes much - experiment shows that, if you have a decent sky view to the south, having WAAS/EGNOS switched on actually has better impact on the self-assessed 'Accuracy' figure than GLONASS does. For a cyclist on road, you don't really need either, but if you don't need to optimise battery runtime by all means have them on. USB Mode I think is best left on Garmin (the other option is 'Mass Storage'). This acts as a 'prompted' mode - whenever you connect to a PC you are asked if you want to switch to Mass Storage - which to be fair, you usually do. However if you select Mass Storage in this setup menu there is no prompt and it locks you out of Garmin mode altogether. |
|
|
To save any change, just use the Back key to return to the previous menu page.
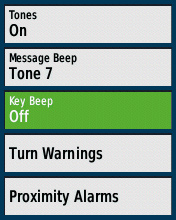
Go into Tones to turn off the beep on every keypress.
Choose one of the more strident beeps for the Message Tone.
Now go into the two submenus ...
|
|
|
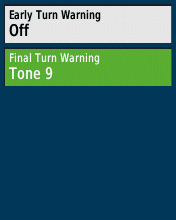
On a typical laney route with frequent instructions, the Early Turn Warning just gets in the way. I turn this off (left).
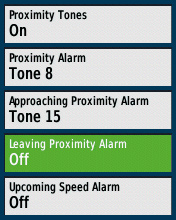
Proximity alarms are a bit of a rarity, but they may as well be turned on. However I turn Leaving Proximity Alarm off, as again it just adds confusion - you need a warning that you are approaching a particular point, but you don't usually need to be warned when you leave it. NB that Proximity is often confused with the feature that determines how soon before a waypoint the GPS beeps - that's not the same thing and the control for that is found in the Setup Routing menu. |
|
|
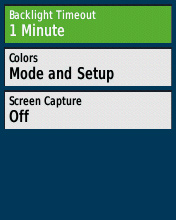
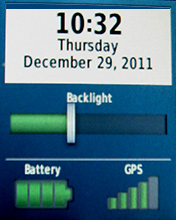
The last part of the most basic setup is the Display setup. The backlight timeout and brightness settings are obviously of importance if you need to maximise battery runtime. The Timeout is found here in Setup Display, but the Brightness is not - it's on the right-hand 'Power' key. For daytime use, you would either want the brightness to be high (because anything lower won't be noticeable), or off (to save battery). For mixed or night use, a low setting is best (see right). Assuming you opt for a low Brightness setting, the Timeout can be quite long, or even (for night use) always on. With a high Brightness setting, use a Timeout of 30 seconds or less. NB that on these new Etrex models, the backlight setting is 'sticky' and you don't have to activate it after switch-on like you did with the older models. |
|
|
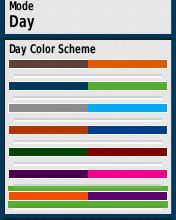
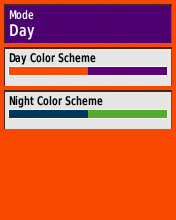
Now go into the 'Mode and Setup' submenu, to set your colours. The default (as in the screenshots so far) is rather drab - it's the 2nd option listed in the screenshot (left) - there are a few more if you scroll down. In 'Day' mode, in each colour bar the left part is the background colour, and the right is any highlighted element, and also the compass pointer. I think the right half needs to be fairly dark, to make the reversed-out text work better, while the left needs to be a mid-tone and a decent contrast.
My choice looks awful and garish on a PC screen, but works OK on the low-contrast GPS screen. It's not ideal though - to be able to choose each colour independently would be nicer!
|
|
|
|
Incidentally none of these colour changes will make any difference to the appearance of the Map page. The only time that changes is when the GPS switches into 'Night' mode. All other screens are affected in the sort of way that you see from the screenshots below. A tip - if you make use of the 'Profiles' feature in this GPS, then set a different colourway in each profile, so you can see at a glance which mode you're in.
| |
|
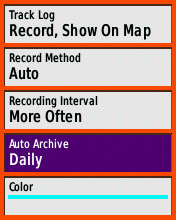
Really, that ends the most basic setup stuff, but while we're here and since it's on page 1 of the Setup menu, lets do the Tracks Setup. This screen pertains only to your recorded Track - not any stored or uploaded ones, they can be coloured individually in Track Manager.
The default Record Method of 'Auto' is the best choice for 95% of purposes. I do know of people who record once per second, or once per 10 metres, but in my opinion these are just ways of generating excessively large amounts of data to no practical purpose. OK, for amateur surveying purposes, there may be some value in laying down points every 10 metres. I don't see any point at all in recording once per second - that's just a bit obsessive, even for me! Anyway, these options are there, under 'Record Method'.
In combination with these setttings, the Archive should be set to 'Daily'.
| |

|
The default colour for the recorded Track is Cyan and is a good choice in my opinion. Map Setup is covered on this separate page so leaving that aside for now -
Page Sequence is an interesting option but it brings us back to the important idea of re-arranging the tiles on the main menu screen, to make our own favourites more accessible. This is done (from the Main Menu) via the left or Menu key.
This page continues with more setup stuff including Map Setup and Routing Setup -
| |
Francis Cooke
Some basic stuff:
Living with a Garmin: Etrex Basic Setup
Living with a Garmin: Battery Runtime and Etrex Jitter
Living with a Garmin: The Waypoints Limitation
Living with a Garmin: The Follow Road Trap
Living with a Garmin: The Circular Routes Problem
Living with a Garmin: Declutter the Page Sequence
Living with a Garmin: Living with Metroguide Maps
Living with a Garmin: Waypoint Naming (for direct-style routes)
Living with a Garmin: Colour your Tracks and Routes
Living with a Garmin: Create a Route on the GPS
Top 5 GPS Tips (pdf) reprint of Arrivee article published Feb 2007
Some GPS FAQs web version of Arrivee article published Nov 2008
NEW - Garmin Etrex 20/30 essays:
Etrex 30 review reprint of Arrivee article published Jan 2012
Etrex 20 & 30, Basic Setup
Taming the Etrex 20/30: Restore the 'Page' key.
Living with a Garmin: Show on Map (Tracks)
Dakota 20 review reprint of Arrivee article published Feb 2010
Living with a Garmin: Waypoint Naming and the Dakota 20 / Etrex 30
More Garmin essays - not-so-basic:
Garmin Etrex C Menu Map (pdf, July 2008)
Living with a Garmin: Full Reset
Living with a Garmin: Track, Route or Autoroute
Living with a Garmin: Three Ways to Beat the Waypoint Limit
Living with a Garmin: Three Ways to Beat the Trackpoint Limit
Living with a Garmin: Less is More
Living with a Garmin: Add Contours to your GPS Maps
Living with a Garmin: Struggling with GPX &... More GPX
Living with a Garmin: Screens you don't see every day
Living with a Garmin: Downgrade your Mapsource
Living with a Garmin: Put an OSM Map on your Garmin
Living with a Garmin: GPS Soak Test files to test your GPS waypoint capacity
OpenStreetMap and Mapsource Add OSM to your Mapsource collection
A Google Maps Workflow Create, Edit, Save, Share and Export a route