Living with a Garmin:

Basic Setup
These notes and screenshots show a basic cyclists' setup for a Legend HCx.
Venture, Legend C and Cx are very similar, as are the 60 and 76 series.
Some notes in [brackets] are added where appropriate for the Vista and Summit models.
**These notes are NOT suitable for the Edge series, or the Colorado/Oregon/Dakota models.**
A similar page for the Etrex 20 and 30 models is here.
The idea with most of this stuff is to SET IT, then FORGET IT.
The main keys in use for all this are:
Menu (bottom l-h key)
Enter (front click stick)
Quit or Page (top r-h key)
A key sequence might be written like this:
Menu->Menu->Setup->System->Menu->Software Version
(from any page, this will display the current software version and unit ID)
|
You may or may not wish to do a Full Reset of your GPS (click link for more information) before continuing with the rest of this ...
1. Power off, then switch on again.
On this page, I do also select Track Up and Multicolor - but these are just niceties and not essential to Basic Setup. |
|
| 2. Menu->Menu->Setup->System Match the battery type to whatever you use - though I recommend if you use Lithium primary cells (Energizer) - which do work very well in these GPS - you set this to 'Alkaline' (not Lithium even if you have that option available). The increased accuracy of WAAS/EGNOS is not needed for cycling, and is a slight battery hit.
I hate that garish colour scheme so I'll tackle that next ... |
|
| 3. Menu->Menu->Setup->Display These are my choices. A bit more restful! However setting the Display Mode to 'Auto' gives you the switchover to 'night' colours at sunset - which many people like.  
The backlight at a lowish percentage is not a huge battery hit, so there's no real need to be mean with it at night. 1 minute means that it will light up about 10 seconds before a turn, then stay on for 1 minute afterwards. Some people like to set it at a lower percentage then leave it on continuously for night riding - you can do this because the battery runtime in these colour Etrexes is very good. |
| 4. Menu->Menu->Setup->Time Note that one thing you never have to do with a GPS is set the time. Instead, it synchronises with the atomic clocks on the satellites. Your GPS is the most accurate timepiece you will ever own. On the other hand, you do have to set up the Time Zone - now why on earth is that?? After all, it's a GPS - it knows where it is - why do you have to tell it? The time zones (cities) are not listed alphabetically - they are in east-to-west order, which is just ... weird. |
|
| 5. Menu->Menu->Setup->Units The position format and map datum shown is Garmin's default which is a good option for anywhere in the world. In the UK you would probably prefer British Grid and another interesting option is hddd.ddddd which is the GPX standard (also used by Google Maps). Vista owners will see an additional option, for Pressure units, on this page. |
|
| 6. Menu->Menu->Setup->Tones There's no volume control unfortunately - and no voice prompts - YET!!
If you use proximity waypoints (actually, they aren't very useful, I leave them turned off) there are a couple of things to note - Access to this screen (right) is a bit different in older models - they have a separate Proximity Setup menu, not reached via the Tones Setup. |
|
| 7. Menu->Menu->Setup->Routing Prompted is best if you have a map that can auto-route. If you don't have such a map, then you should set Guidance Method to 'Off Road' - do NOT use 'Follow Road'.
Now go into Follow Road Options |
|
| 8. Menu->Menu->Setup->Page Sequence Use this facility to strip out any pages you don't use much, so that the Page key just cycles through a minimum set. I never use the Compass page so I've got rid of it, it can still be accessed if needs be by Menu->Menu->Compass. I also set Trip Computer to be the first in the list, so it is the default on switch-on, because this is the page where you can do a daily odometer reset - see right (Vista). Notice that I have removed the Menu page from the list, so it no longer appears when I cycle through the pages using the Page key. It can always be accessed by pressing the Menu key twice in succession Menu->Menu->
[ Vista owners: |
|
| 9. Menu->Menu->Track->Setup I think the 'Auto' record method works very well. But you can opt to record a trackpoint every few seconds, or every few metres, if you prefer. For example, for rough surveying purposes, this (see right) would record a point every 10 metres. In Auto, interval 'More Often' lays about 50% more points than 'Normal' which is well worth doing, but 'Most Often' only adds a further 10% or so. The track colour is carefully chosen to be different from any map features especially roads, and also different from the colour I use for any stored tracks (green). |
|
| Now go into Data Card Setup and, if you have some spare space on the card (see green bar graph) make sure that the 'Log Track' box is ticked.
Note that in this picture there are a lot of Tracks already stored on the card, which were not wiped by the Full Reset I did earlier. |
|
|
And now a deep breath before the final and most complicated basic setup menu - the Map setup. |
||

| 10. Menu->Menu->Setup->Map This is page 1 of 6. Its very important to get all these setting the way you like them.
Scroll across to page 2 (right). These settings are not at all vital but you should raise the Track Points from the default (3000) to the max (10000). |
|
| Across to page 3. I still experiment with these and probably haven't got this right yet - but figures any higher than this make the map very cluttered and slow to redraw. You don't need to visit pages 5 and 6, they should be fine as they are. |
|
| 11. More Map Setup Page->Page-> etc until you reach the Map Page, then zoom it in to a sensible level, I use 120m as my base level and zoom in and out from that when riding.
Now press Menu->Data Fields->2 |
|
| Now Menu->Change Data Fields and choose what you want to see in the top left box ... and top right box... then use the Quit key to 'fix' your choices. |
|
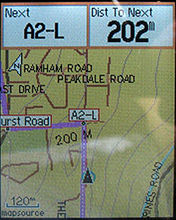
| So with my choices, when navigating a Route I get something like this - the name of the next Waypoint and the distance to it counting down - very nice. I also turn Guidance Text off Menu->Guidance Text->Never Show but this is more of a personal preference and probably depends on which routing method you favour - Off Road or Follow Road - as the messages are often more informative in Follow Road. |
|
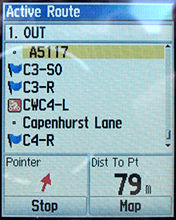
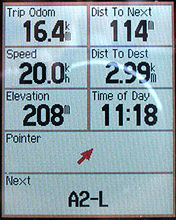
| 12. Setup other pages You need to repeat the Data Fields and Change Data Fields procedures for each of your favourite pages - so in my case that is the Active Route page and the Trip Computer page. In each page, just use Menu->Change Data Fields. In my case, they end up like this. And this. I don't use a cyclecomputer and don't carry a watch - so that uses up 3 fields on my Trip Computer display. If you have this information elsewhere, there are lots of other interesting fields you can choose from - average speed excluding stops, highest elevation so far, etc - over 50 in all. |
|
| Note the Active Route page isn't normally accessible unless you have a Route loaded, but you can get in to edit it by starting a 'New' route like this Menu->Menu->Routes->New->Menu->Change Data Fields then Quit->Quit out when done. |
|
| [ Vista owners: You need to visit the Heading Setup Page Menu->Menu->Setup->Heading and set a very low speed for Switch to compass heading and the shortest possible time delay before this kicks in. Or better still, turn the compass off - it is a battery hit, and it requires frequent calibration. Turn the compass off (or on) at any time using a long press of the top right button.
Then you need to visit the Altimeter Setup Page Menu->Menu->Setup->Altimeter |
|
 | [ Vista owners: You may also want to adjust the Altimeter Page Zoom Ranges in Altimeter Page, Menu->Zoom Ranges. This is best done after you've done a hilly ride and have a decent altitude plot to look at.
Just use the front joystick to alter the vertical and horizontal scales, and then click it to fix them.] |
|
Francis Cooke
Some basic stuff:
Living with a Garmin: Etrex Basic Setup
Living with a Garmin: Battery Runtime and Etrex Jitter
Living with a Garmin: The Waypoints Limitation
Living with a Garmin: The Follow Road Trap
Living with a Garmin: The Circular Routes Problem
Living with a Garmin: Declutter the Page Sequence
Living with a Garmin: Living with Metroguide Maps
Living with a Garmin: Waypoint Naming (for direct-style routes)
Living with a Garmin: Colour your Tracks and Routes
Living with a Garmin: Create a Route on the GPS
Top 5 GPS Tips (pdf) reprint of Arrivee article published Feb 2007
Some GPS FAQs web version of Arrivee article published Nov 2008
NEW - Garmin Etrex 20/30 essays:
Etrex 30 review reprint of Arrivee article published Jan 2012
Etrex 20 & 30, Basic Setup
Taming the Etrex 20/30: Restore the 'Page' key.
Dakota 20 review reprint of Arrivee article published Feb 2010
Living with a Garmin: Waypoint Naming and the Dakota 20 / Etrex 30
More Garmin essays - not-so-basic:
Garmin Etrex C Menu Map (pdf, July 2008)
Living with a Garmin: Full Reset
Living with a Garmin: Track, Route or Autoroute
Living with a Garmin: Three Ways to Beat the Waypoint Limit
Living with a Garmin: Three Ways to Beat the Trackpoint Limit
Living with a Garmin: Less is More
Living with a Garmin: Add Contours to your GPS Maps
Living with a Garmin: Struggling with GPX &... More GPX
Living with a Garmin: Screens you don't see every day
Living with a Garmin: Downgrade your Mapsource
Living with a Garmin: Put an OSM Map on your Garmin
Living with a Garmin: GPS Soak Test files to test your GPS waypoint capacity
OpenStreetMap and Mapsource Add OSM to your Mapsource collection
A Google Maps Workflow Create, Edit, Save, Share and Export a route