Living with a Garmin:

Track, Route or Autoroute
Which of several ways to navigate with a GPS? It's personal choice. There is no 'best' method.
|
To put my cards on the table, of the 6 methods I list below I use Direct routing - but for the purposes of this page I'll try to give a balanced view of the pros and cons of each.
I can think of 6 methods of navigating with a GPS, and some of these can be combined, for example I know someone who swears by methods 2 and 5 below, used together:
1. GPS but use a map - use the GPS to tell you where you are (a grid ref maybe) along with other useful information such as speed, trip distance, time, altitude - but navigate using a traditional paper map or routesheet.
Before going on to methods 2-6, there are some general cons that are common to all of them: cons: * Battery dependency, device dependency - there are some obvious precautions - carry a spare set of batteries, carry a map (or torn-out atlas page) as backup, or, when these things become cheap as chips, just carry a spare GPS. (On a long tour, this can be a lighter-weight option than carrying backup maps.) * You need a computer, and you need to be able to connect the GPS to it. Connection is not always as easy as it could be, and support from 'alternative' OSs tends to lag a little behind Windows. * Trees and high buildings can interfere with the functioning of the GPS so in theory you could miss a turn - in practice for on-road cycling use this is almost never a serious problem. * If you stop for any reason, the GPS tends to be rather unhelpful until you move again - using a GPS to 'stop and check the map' is a very bad idea!
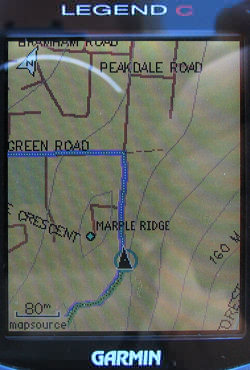
2. Use a Track - draw a Track along the route in software, or using an online mapping facility, then transfer it to the GPS, and set it to visible (I'd set it to a nice bright colour - green is good, or blue maybe - and a thickened line as well - see screenshot below.) |
|
cons: - as well as the general cons mentioned above - * You're not getting much assistance from the GPS - for example, many of the Trip Computer fields don't work - this method really depends on you keeping an eye on the screen and working out what is needed at each junction, to stay on track. * If you do go off-route, a non-map-based GPS cannot do much to help you back, other than re-traceing. * During preparation, you probably have to downsample the track(s) to contain not more than 500 points. See the note about this under 3 below.
3. Use a Track with Trackback - draw a Track along the route in software, or using an online mapping facility, then transfer it to the GPS. |
|
cons: - as well as the general cons mentioned above - * If you do go off-route, a non-map-based GPS cannot do much to help you back, other than re-traceing. * During preparation, you probably have to downsample the track(s) to contain not more than 500 points. This isn't difficult or slow, but it is an extra step that sometimes requires a different piece of software. If you downsample by a large amount - say 4000 points down to 500 - then you might start to compromise the track itself - it may no longer be accurate enough to be a reliable guide - it will begin to look more like a Direct Route (see below) having all the disadvantages but none of the advantages of that format. However, this is exaggerating the problem - moderate downsampling, say from about 2000 points down to 500, works very well and its just another button-click in the preparation routine. * Tracks that retrace and/or (especially) cross themselves should be split to avoid confusion. | |
|
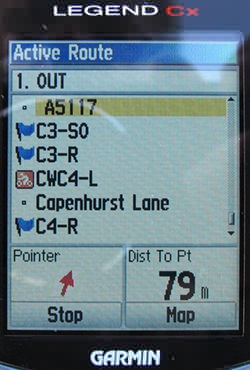
4. Use Direct routing - draw a Route along the route by joining the dots from turn to turn, in software or using an online mapping facility, then transfer it to the GPS. When riding, navigate using Off road (in Garmin-speak) and follow the shape and instruction (if any) at each Waypoint. pros: * You don't need a map-based GPS for this - a cheap device will do (but not the absolute cheapest, as some of these cannot accept computer data). A map-based device can be a much better experience though. * You don't have to worry about navigation in between the waypoints, and you get good advance notice of when you will arrive at the next one. I see these as the main advantages of this method. * Navigation is very quick - you have an excellent preview of what you are going to have to do at the next waypoint, long before you get there. * A map-based GPS will prompt at every waypoint with instructions that are often helpful - though sometimes not ... * Even on a non-mapping GPS, you can build instructions into the waypoint names, to give advance notice of a L or R turn, etc. * Plenty of storage - a typical mid-range Garmin can store 50 routes of up to 250 waypoints each - in laney country this totals about 10,000km while in remoter areas such as central France it could be 2 or 3 times that much. |
|
cons: - as well as the general cons mentioned above - * Preparation can be very time-consuming. For everything to work as it should the waypoints have to be positioned as precisely as possible, and this makes marking up the map a rather slow and painstaking job. If you go to the lengths of naming the waypoints to include route hints, this is even more preparation. Personally I think its worth it, for anything more than a casual day ride - but much depends on how the Route will be used - do you hand it out to other riders, is it a route that will be ridden several times, etc. * Routes that go over the waypoint limit (usually 250) have to be split - not really a problem in practice, as 250 waypoints is, on average, good for 200km. * Routes that are designed for Auto-routing (see below) will not contain enough waypoints to be useful in Direct mode. * Routes that retrace and/or cross themselves should be split to avoid confusion. * If you do go off-route, a non-map-based GPS cannot do much to help you back, other than retraceing.
| |
|
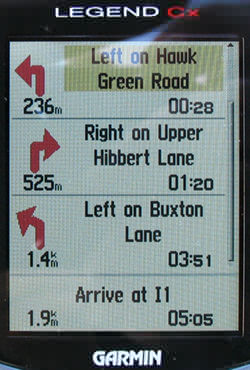
5. Use Assisted Auto-routing - set up a few Waypoints along the route to define places that must be passed through and draw a Route through them, in software or using an online mapping facility, then transfer it to the GPS. When riding, navigate using Follow road (in Garmin-speak) and follow the shape and instructions at each turn. A good tip, if you use this method, is to place your Waypoints on roads but away from junctions - this is the opposite of what you would normally do for Direct routing. It's hard to explain, but in practice this makes the instructions much clearer. pros: * Preparation is quick, probably takes no longer than preparing a Track would. * Navigation is very quick - you have an excellent preview of what you are going to have to do at the next turn, long before you get there, and the instructions are usually more user-friendly than the ones generated by Direct routing. * If you do go off-route, the GPS will guide you back by the shortest way. cons: - as well as the general cons mentioned above - * You need a map-based GPS, and you need to load it with a compatible autorouting map. These can be expensive, although with a bit of fiddling it is now possible to find free, open-source, routable maps for some areas. * The decisions made by the GPS may not always be the ones you would choose yourself. Nothing to stop you ignoring it of course! In Garmin, Delivery seems to work a bit better than Bicycle for road cycling. NB that there's no guarantee that the route generated in the GPS is even going to be the same as the one you saw generated on your PC screen. Use a few more Waypoints, to make certain. |
|
* Typically, Routes are limited to 50 waypoints. This is no problem when preparing a route from scratch (50 is loads) but a route designed for Direct routing would probably have 100+ waypoints and so be incompatible. * Its advisable to have a high proportion of User Waypoints included in your 50 waypoints - say about 1 in 2 at least - this is because if you do stray off-route the recalculation will only look to the next up-coming User Waypoint, and not at any intermediate Routepoints. Because of this its best to set off-route recalculation to 'Prompted' - often you won't want it to kick in.
| |
|
6. Use Auto-routing - set up a Destination and when riding, navigate using Go To and Follow road (in Garmin-speak) and follow the shape and instructions at each turn. pros: * With the right GPS and maps, you don't need a computer. * Almost zero preparation required. * You have an excellent preview of what you are going to have to do at the next turn, long before you get there. * If you do go off-route, the GPS will guide you back by the shortest way (set off-route recalculation to 'Auto'). cons: - as well as the general cons mentioned above - * You need a map-based GPS, and you need to load it with a compatible autorouting map. These can be expensive. * You need a lot of faith, and probably a handy paper map. * If the route is complex and you do choose to deviate, off-route recalculations can be very slow. * The decisions made by the GPS may not always be the ones you would choose yourself. Nothing to stop you ignoring it of course! In a Garmin, Delivery seems to be preferable to Bicycle for road cycling.
One suggestion that I have heard, is to combine 2 and 6 above - lay down a Track and then use Autorouting, with the Track as a visual confirmation that the suggested route is a good one. Could work well. On a modern Garmin you have the facility to change the Route colour - changing it to white or to yellow (the map background colour) would make the display less cluttered and highlight the Track, but still give you the turn instructions generated by the Route. |
Francis Cooke
Some basic stuff:
Living with a Garmin: Etrex Basic Setup
Living with a Garmin: Battery Runtime and Etrex Jitter
Living with a Garmin: The Waypoints Limitation
Living with a Garmin: The Follow Road Trap
Living with a Garmin: The Circular Routes Problem
Living with a Garmin: Declutter the Page Sequence
Living with a Garmin: Living with Metroguide Maps
Living with a Garmin: Waypoint Naming (for direct-style routes)
Living with a Garmin: Colour your Tracks and Routes
Living with a Garmin: Create a Route on the GPS
Top 5 GPS Tips (pdf) reprint of Arrivee article published Feb 2007
Some GPS FAQs web version of Arrivee article published Nov 2008
NEW - Garmin Etrex 20/30 essays:
Etrex 30 review reprint of Arrivee article published Jan 2012
Etrex 20 & 30, Basic Setup
Taming the Etrex 20/30: Restore the 'Page' key.
Dakota 20 review reprint of Arrivee article published Feb 2010
Living with a Garmin: Waypoint Naming and the Dakota 20 / Etrex 30
More Garmin essays - not-so-basic:
Garmin Etrex C Menu Map (pdf, July 2008)
Living with a Garmin: Full Reset
Living with a Garmin: Track, Route or Autoroute
Living with a Garmin: Three Ways to Beat the Waypoint Limit
Living with a Garmin: Three Ways to Beat the Trackpoint Limit
Living with a Garmin: Less is More
Living with a Garmin: Add Contours to your GPS Maps
Living with a Garmin: Struggling with GPX &... More GPX
Living with a Garmin: Screens you don't see every day
Living with a Garmin: Downgrade your Mapsource
Living with a Garmin: Put an OSM Map on your Garmin
Living with a Garmin: GPS Soak Test files to test your GPS waypoint capacity
OpenStreetMap and Mapsource Add OSM to your Mapsource collection
A Google Maps Workflow Create, Edit, Save, Share and Export a route