Living with a Garmin:

Waypoint Naming
|
Obviously when you mark a place as a Waypoint, you give it a name. Less obviously, when you create a waypoint as one of a sequence of several that form a Route, you might also want to name it, typically to give some turn instruction such as 'Left' or '3rd exit at roundabout'.
| ||
|
Routepoint naming is a useful extra tweak if you are making a 'direct' (or 'off-road') Route, but not essential. If you prefer autorouted Routes (or 'follow road') then there really isn't any point at all and you can stop reading this now.
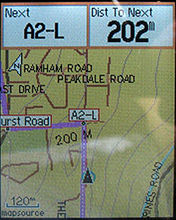
With direct routing and named Routepoints, you can make good use of one of the GPS killer features, the 'Distance to Next' data field. Put this at the top of your map and put the 'Waypoint at Next' field next to it. If you do this, it helps if you avoid too many intermediate 'shape' or 'confirmation' points - ideally every time you negotiate an instruction, the next point you see will be the next instruction. Less is more.
| |
| Here are a few basic tips about Routepoint names.
Firstly, they must be unique, on the GPS.
Secondly, I find it's best to limit Routepoint names to 6 characters maximum. Thirdly, you may want to make names that naturally sort into the right order, or naturally group themselves (for example, start all tea-break locations with a T, all left turns with a L etc). Neither of these is necessary for the GPS to function properly, but on big projects they can certainly be helpful. To be honest I don't bother much with this.
| ||
| So to cut to the chase, I recommend using names like the one in my first example above, 127-LR. Let's break this down. Anything before the dash is the unique Id, and need not have any other significance at all, and anything after it is an instruction. You could put the instruction first and Id after if you prefer, and you could use a space, dash, underscore, dot or colon as a separator as you prefer - I think the dash or underscore is clearest. You could in theory assign just 2 characters to the unique Id - using letters and digits this would allow 2116 possibilities which in practice is more than enough even for a 2-week tour. (And you could easily double this up by varying the separator as well.) However this doesn't leave much wiggle room - on big projects you have to keep careful track and ensure that not too many unique slots are 'wasted'. For 1-day projects - 2 chars is fine. I prefer to use 3 digits and let them count up from 001 to 999, without bothering too much if I miss one or two or have to insert one out of order. If I need more than that (which is fairly rare) I'll start to use letters, A01 to A99 and so on.
Remember, these numbers mean nothing, and they don't even have to be in sequence or in the right order. But if you want, you could try tying them to the distance. This might work well if you're translating a turn-by-turn routesheet. For example: So anyway - 3 chars unique Id - one separator - I only have 2 characters left for my meaningful instructions. Is this really enough? Well, yes.
Bear in mind that for a GPS user, given instructions like 'Left at T' or 'Straight on at X', the T and the X are surplus to requirements. They just describe a location but on a GPS you have about 8 satellites doing that job for you - the instruction is simply flagged up when you get to the right place. So you don't need to encode, for example, LT or SOX, because L and SO will do just as well.
| ||
| Here's my complete (and very short) list of possible instructions: -L -R -SO -LR 'Left and shortly Right' - ie, turn Left then take the next Right which is already in view. -RL -LL -RR -X3 this would be '3rd exit at roundabout' obviously other numbers are possible. I generally only use this at large roundabouts if L or R or SO isn't clear enough. | ||
| Some notes about Mapsource. I use Mapsource for Route construction most of the time, if you use other software, or an online planner, some of this may or may not apply.
In Mapsource, there is a clear difference between the points laid down by the Waypoint Tool, and the Route Tool. The latter are not editable for name or position, which is more than a little inconvenient.
Now this is where, on large multiroute projects, the infamous Garmin Waypoint Limit starts to rear its ugly head. These limits are for Waypoints - that is, points laid down by the Waypoint Tool - they do not apply to Routepoints (which are what is laid down by the Route Tool in Mapsource, and in some other software).
Using the procedure I described aboove - Waypoint Tool then Route Tool - you end up with a Route in which the Routepoints are also Waypoints, ie, the limits are going to apply. The simplest thing is just to construct Routes that have about half-and-half, Waypoints and Routepoints. Use the Waypoint tool for the major instructions, and then just fill in the rest using the Route tool. So an LR would be a named Waypoint, but the following right turn could just be drawn in later with the Route Tool. An SO could often just be marked with the Route Tool, so generating a randomly-named Routepoint. Using methods like this will take you a lot further before you have to worry about the Waypoint Limit. A useful trick if you're doing this, in Mapsource, is to set (in Preferences) a Waypoint name prefix (use a letter that can't be misinterpreted as an instruction, such as K). Then your automatically-generated Routepoint names are unique but clearly separate from whatever naming system you're using.
There are more hardcore solutions to dealing with the Waypoint Limit, for example I have made, used and distributed a 17-day Land's End-John'o'Groats project that uses 1254 Routepoints, only 38 of which are Waypoints, It works quite comfortably even on old low-spec GPSs.
Francis Cooke | ||

Some basic stuff:
Living with a Garmin: Etrex Basic Setup
Living with a Garmin: Battery Runtime and Etrex Jitter
Living with a Garmin: The Waypoints Limitation
Living with a Garmin: The Follow Road Trap
Living with a Garmin: The Circular Routes Problem
Living with a Garmin: Declutter the Page Sequence
Living with a Garmin: Living with Metroguide Maps
Living with a Garmin: Waypoint Naming (for direct-style routes)
Living with a Garmin: Colour your Tracks and Routes
Living with a Garmin: Create a Route on the GPS
Top 5 GPS Tips (pdf) reprint of Arrivee article published Feb 2007
Some GPS FAQs web version of Arrivee article published Nov 2008
NEW - Garmin Etrex 20/30 essays:
Etrex 30 review reprint of Arrivee article published Jan 2012
Etrex 20 & 30, Basic Setup
Taming the Etrex 20/30: Restore the 'Page' key.
Dakota 20 review reprint of Arrivee article published Feb 2010
Living with a Garmin: Waypoint Naming and the Dakota 20 / Etrex 30
More Garmin essays - not-so-basic:
Garmin Etrex C Menu Map (pdf, July 2008)
Living with a Garmin: Full Reset
Living with a Garmin: Track, Route or Autoroute
Living with a Garmin: Three Ways to Beat the Waypoint Limit
Living with a Garmin: Three Ways to Beat the Trackpoint Limit
Living with a Garmin: Less is More
Living with a Garmin: Add Contours to your GPS Maps
Living with a Garmin: Struggling with GPX &... More GPX
Living with a Garmin: Screens you don't see every day
Living with a Garmin: Downgrade your Mapsource
Living with a Garmin: Put an OSM Map on your Garmin
Living with a Garmin: GPS Soak Test files to test your GPS waypoint capacity
OpenStreetMap and Mapsource Add OSM to your Mapsource collection
A Google Maps Workflow Create, Edit, Save, Share and Export a route