A Google Maps Workflow:

continued ...
|
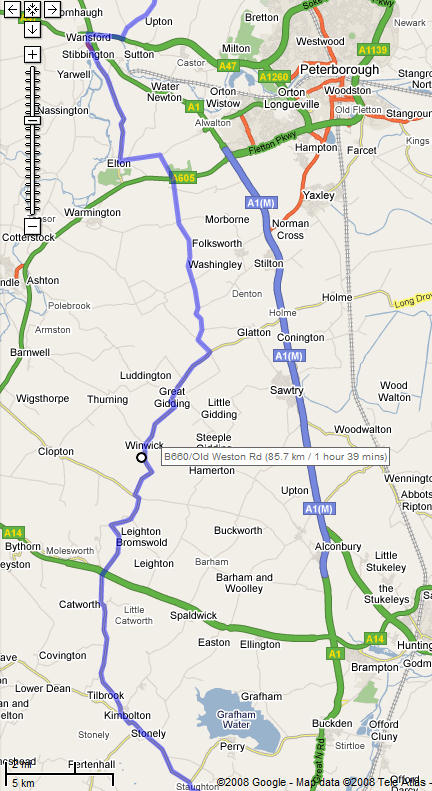
the story so far ... We have a perfectly good 'cyclable' route but its still quite main-roady in parts and goes right through Peterborough - as cyclists we would want to find a better way. We want to go through Catworth, Great Gidding and Elton. Choose a middling zoom and pull the map around until you can see both the near-Motorway section and the villages of Catworth, Great Gidding and Elton, which are off to the west of the main road. now read on ... | |
|
Hover over the blue-highlighted route and you should see a little pop-up message Drag to change route. Now just use the mouse to slowly and carefully drag the white dot over towards Great Gidding - you'll see the route updating itself as you go and giving all sorts of laney options, when you see an option you like, you drop the white dot. This is very quick indeed when you get the hang of it. Drop it on Great Gidding, or better still on the B-road just before or after the village. (Because if you drop it on the village itself you might inadvertantly place it on a little side road.)
The route updates and it so happens that this (apart from a few hundred metres at each end) is now exactly the route as described on the 2005 LEL route sheet. It's taken me a long time to describe this, but once you get the idea it's actually quicker than, say, going over a paper map with a yellow highlighter. And GMaps is improving and developing all the time - by the time you read this, they might have added a 'By Bicycle' option - or a way to change the colour of the highlighting ('cos I think the blue is a bit confusing). Notice that not only do you have a highlighted map, but a passable 'route sheet' of directions which you could print out. Let's just tidy up the ends to make it perfect. |
|
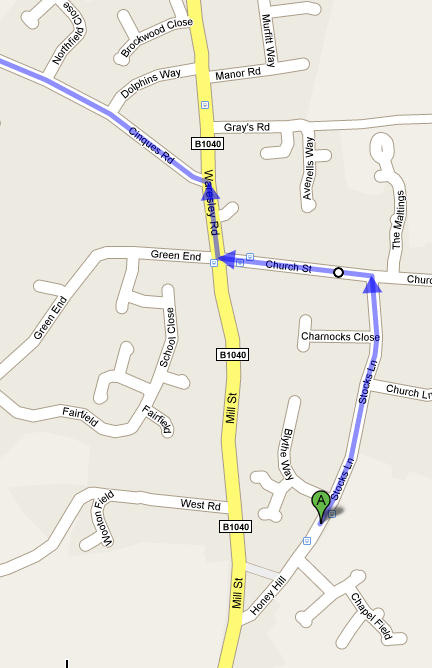
Click on line 1 of the directions - the map scrolls back to the start at Gamlingay. You'll probably find that the blue route doubles back on Honey Hill and turns right on the B road. The route sheet calls for a right turn out of the control, and a L on Church Street - so do the drag-and-drop trick again, to drop a white dot on Church Street. That's that end sorted. To quickly switch to the Thurlby end just click on the last line of the route directions. The control in Thurlby is at the end of the cul-de-sac called Crown Lane - so just drag the B marker there. Zoom out for an overview. Perfect.
The next step is to Save your GMapped Route. Towards the top right click on the blue word Link - a long complicated web address appears ready-highlighted, so Copy this [Ctrl-C] and paste it into your browser address bar [Ctrl-V] and then hit [Return] to go to this address. The map will re-load, looking much the same as before.
What can you do with it now? Well, obviously you can print out the map, in sections, at whatever zoom level you're comfortable with - maybe including big zoom-ins of the Control villages. Click on 'Print' and you get some interesting options, including a very nice Route Sheet layout (though a bit different from the typical AUK format).
If you wanted to share this route with a friend - well its a very long complicated web address and as you know, its often rather dificult to put these in an email, so you need to 'tiny' it. |
|
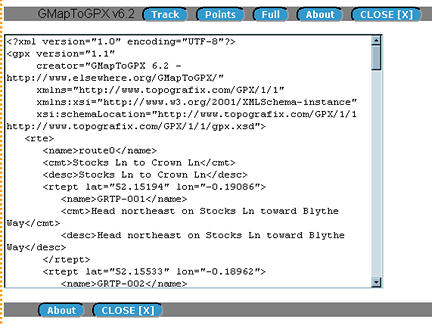
Unlike most other online mapping sites, such as Bikely or the rather astonishing BikeHike, GMaps doesn't (yet) offer an Export to GPX option. GPX is the near-universal language of waypoints, tracks and routes that is going to help us get this route into a GPS.
Instead, we have to use a workaround provided by GMapToGPX, which we bookmarked earlier. Its important to have a Saved version of the Map and Route on screen at this point - ie with the the very long complicated address in the address bar. A screen like this (left) appears.
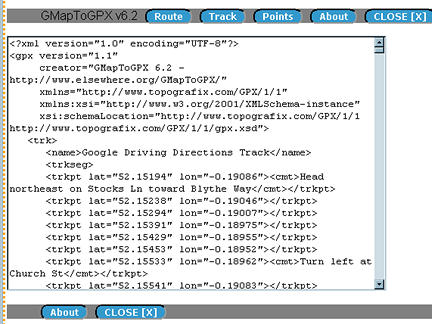
By default you are offered a Route file - and this is a pretty good option which gives reasonable results with minimum hassle. However this time we'll click on 'Full' (2nd screenshot), to get a Track file which follows the road exactly.
Now we need to copy all this text into a text editor and save it as GPX. So click on the text, use [Ctrl-A] to highlight it all, then [Ctrl-C] to copy it. Open your text editor with a blank document and [Ctrl-V] to paste. Click on 'Close' to return to your Google Map.
Incidentally I have found GMaptoGPX gets rather flakey if the route is too complex - that is, if you've had to use more than say about 8 white Via Points to pull it around. And it seems to be worse in overseas maps, for some reason. All you can do in this case is to split the route into shorter sections to simplify things. |
|
This GPX file can be opened in your copy of Mapsource, or Trip & Waypoint Manager, or in most other map or GPS-related programs that you might have on your PC. It will appear as a Track (but we could have chosen 'Route' in GMapToGPX - try it!). Using the Garmin programs, you can simply connect your GPS and transfer it into the GPS - except there's a problem.
Many Garmin units can only store Tracks of 500 points or fewer. Any track generated in this way that is more than about 40km long is likely to have more Trackpoints than this. My 85km example has 747. Now just transfer your sub-500-point green Track to the GPS. You can navigate simply by using this as a scrolling highlighted map on the handlebars, or better by using the GPS Trackback facility, which will then give you turn prompts when appropriate | |
Francis Cooke